


Using
@font-face to load custom web fonts is a great feature to give our sites a unique and memorable aesthetic. However, when you use custom fonts on the web using standard techniques, they can slow down page load speed and hamper performance—both real and perceived. Luckily, we've figured out some methods to apply them carefully to ensure your site correctly balances usability, performance and style.
The problem with @font-face
The CSS
@font-face declaration is the standard approach for referencing custom fonts on the web:/* Define a custom web font */
@font-face {
font-family: 'MyWebFont';
url('webfont.woff2') format('woff2'),
url('webfont.woff') format('woff'),
url('webfont.ttf') format('truetype'),
}
/* Use that font in a page */
body {
font-family: 'MyWebFont', sans-serif;
}
Clean and simple, but unfortunately most browsers’ default handling of
@font-faceis problematic. When you reference an external web font using @font-face, most browsers will make any text that uses that font completely invisible while the external font is loading [Fig. 1, below]. Some browsers will wait a predetermined amount of time (usually three seconds) for the font to load before they give up and show the text using the fallback font-family. But just like a loyal puppy, WebKit browsers (Safari, default Android Browser, Blackberry) will wait forever (okay, often 30 seconds or more) for the font to return. This means your custom fonts represent a potential single point of failure for a usable site.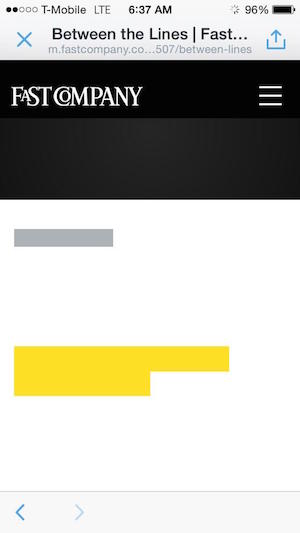
FIG 1: Screenshot of a webpage loading in iOS Safari, with text invisible until custom fonts finish loading.
Even when the fonts do load correctly, custom fonts slow down the perceived speed of a site significantly because a page full of invisible text isn't exactly usable. Sure, once the first page is visited, the custom fonts are cached and display quickly, but perceived speed for the first page view is critical. If we can't paint a usable page within a few seconds, a lot of visitors will drop off.
For example, Fig. 2 shows a webpagetest.org timeline illustrating how a site would look when accessed on a stable 3G connection if it were using the default font loading behavior, note that the custom
@font-face text does not appear until a full second after first render:
FIG 2: Timeline of our website using standard custom font loading. On a 3G cable connection, fonts delay by 1 full second.
Our users want a usable page as quickly as possible—within a second, ideally—so we want visible text as close to that goal as we can. There are several approaches you can take to work around these issues, but the most important thing you can do is to move away from the default way we’re told to load fonts.
Here are the criteria you should use when evaluating a font loading approach:
- The CSS request containing your
font-facedefinition(s) should not block page render. Instead of referencing your fonts via<link>s in the<head>or via@importstatements in an external stylesheet, try to load your fonts and font content asynchronously. Don’t worry, we’ll show you how. - Font requests should be set up to ensure the fallback text is visible while loading, avoiding the Flash of Invisible Text or FOIT.
The Filament Group Way™ to load fonts
To optimize for the first view, we first make sure we have a native font in our
font-family stack behind our custom web font, in this case font-family: Open Sans, sans-serif;. This sets the stage for how our text will render using the fallback experience while the font is loading using our new font loading method. JavaScript can then used to detect the best font format to use (WOFF2, WOFF, TTF) and asynchronously load a stylesheet that contains all the fonts embedded as a series of data URIs. This is a bit unconventional but it allows us to load all the custom fonts as a single HTTP request, which is nice both for minimizing reflows (all fonts arrive at once) and for reducing HTTP requests in general. To take this even further, after requesting a font, we set a cookie to flag that the custom fonts are now cached so we can avoid the flash of the default fonts on subsequent pages.STEP 1: PREPARE YOUR FONTS
Custom fonts can be very heavy so the first order of business is minimizing the number of fonts we need to load in the first place. Remember each weight (regular, light, bold) and variant (regular italic, bold italic) of a typeface is a separate font file which can add up quickly. Try to keep the total number of custom fonts to less then five, but we usually shoot for 2-3 if we can.
To further streamline your font delivery, use a technique called subsetting that allows you to remove characters and symbols from a font that you don't need. TheFontSquirrel tool makes this pretty easy.
STEP 2: PREPARE THE FONT STYLESHEETS
Encoding fonts to Data URIs
Let's say we’re using the Open Sans typeface with two different weights: 400 and 700 (Bold). To support the widest range of browsers, we'll need each font in three different formats: WOFF2, WOFF, and TrueType (TTF):
- OpenSans-Regular.ttf
- OpenSans-Bold.ttf
- OpenSans-Regular.woff
- OpenSans-Bold.woff
- OpenSans-Regular.woff2
- OpenSans-Bold.woff2
If you’re missing one or more of these formats, upload it into the Font Squirrel Web Font Generator to create the others for you.
Take each of these font files and encode them into a Data URI so we can embed them into a stylesheet. If you aren’t familiar with how to create a Data URI, there are many options: SASS (Compass), PHP, online generators, or by using OpenSSL on the command line (
openssl base64 -in filename.woff).
Copy the output into three different stylesheets, one CSS file for each font format: WOFF2 (
data-woff2.css), WOFF (data-woff.css), and TTF (data-ttf.css for Android). Here is what an example of data-woff.css might look like:@font-face {
font-family: Open Sans;
src: url("data:application/x-font-woff;charset=utf-8;base64,...") format("woff");
font-weight: 400;
font-style: normal;
}
@font-face {
font-family: Open Sans;
src: url("data:application/x-font-woff;charset=utf-8;base64,...") format("woff");
font-weight: 700; /* Bold */
font-style: normal;
}
Inside of the other font format files, the
src: url(...) format(...) should match up with the specific format. For example, inside data-woff2.css you’d useurl("data:application/font-woff2;charset=utf-8;base64,...") format("woff2"); and for data-ttf.css you’d use url("data:application/x-font-ttf;charset=utf-8;base64,...") format("truetype");.STEP 3: SET UP THE STYLESHEET LOADER
Once a font file is prepared, we’ll need to load it asynchronously to ensure no FOIT occurs. We use our our
loadCSS utility to handle this part. For example, here's how we can use loadCSS to load our WOFF2 fonts:loadCSS( '/url/to/data-woff2.css' );
Of course, we want to load the appropriate font stylesheet for each browser that visits the site. How do we determine which format to use? By default we use the WOFF format because of its breadth of browser support. If a browser passes aWOFF2 feature test, we use WOFF2 instead because its file size is normally about 30% smaller. If we can reasonably guess that the current browser is the defualt Android Webkit Browser (not Chrome), we switch to TTF for Android 4.X support. Keep in mind that if an incorrect format is loaded, the browser will simply fallback to using default local fonts.
Here’s an excerpt of the JavaScript we use to load our fonts. We recommend placing this JavaScript inline in a
script element in the head of your HTML to kick off the font request as soon as possible (more about how we configure the head of our pages with Enhance.js):// NOTE!! The WOFF2 feature test and loadCSS utility are omitted for brevity
var ua = window.navigator.userAgent;
// Use WOFF2 if supported
if( supportsWoff2 ) {
loadCSS( "/url/to/data-woff2.css" );
} else if( ua.indexOf( "Android 4." ) > -1 && ua.indexOf( "like Gecko" ) > -1 && ua.indexOf( "Chrome" ) === -1 ) {
// Android's Default Browser needs TTF instead of WOFF
loadCSS( "/url/to/data-ttf.css" );
} else {
// Default to WOFF
loadCSS( "/url/to/data-woff.css" );
}
The browser will not make the text invisible while our Data URI CSS file is loading asynchronously. This means that the fallback text will be readable while our web fonts are loading—even if the request hangs and never returns.
Figure 3 below shows the change: With this technique we get readable immediately on first render. This is what we’re going for (3G timeline):

FIG 3: Success! Timeline of our website using our recommended custom font loading. On a 3G cable connection, fonts appear on first render.
For more detail on this approach, we’ve also provided a live demo and the source code on GitHub.
Using Cookies to make this Smarter
Up to this point, we've focused on preparing and loading our custom fonts responsibly so we can show the fallback font while we wait for the custom fonts to load. When these fonts finally do load, the browser swaps out the native fonts for custom fonts. This will cause a repaint and usually has small layout shifts since the fonts are slightly different sizes. We think this font shift is a small tradeoff to show a usable page seconds faster on the initial visit but it can be annoying once you start navigating around.
To remedy this, we use cookies to track if the custom fonts are already downloaded and in the browser's cache. If they are, we show the custom fonts right off the bat to avoid any shifting around.
Instead of the font loader above we’ll want to use a different loader, shown below. We’ll want to add a cookie to flag that the fonts are now cached. In addition to noting that the fonts are cached, the cookie also contains the URL to the specific font format being used as well (
data-woff2.css, data-woff.css, or data-ttf.css). Don’t forget to include the Filament Group cookie utility:// NOTE!! The WOFF2 feature test, loadCSS, and cookie utility are omitted for brevity
// Default to WOFF
var fontFileUrl = "/url/to/data-woff.css",
ua = window.navigator.userAgent;
// Use WOFF2 if supported
if( supportsWoff2 ) {
fontFileUrl = "/url/to/data-woff2.css";
} else if( ua.indexOf( "Android 4." ) > -1 && ua.indexOf( "like Gecko" ) > -1 && ua.indexOf( "Chrome" ) === -1 ) {
// Android's Default Browser needs TTF instead of WOFF
fontFileUrl = "/url/to/data-ttf.css";
}
// ADDED: Make sure the fonts are not yet cached
if( fontFileUrl && !cookie( "fonts" ) ) {
// Load the fonts asynchronously
loadCSS( fontFileUrl );
// ADDED: Set the cookie indicating the fonts are cached
// The cookie also denotes what format is used (WOFF, WOFF2, or TTF)
cookie( "fonts", fontFileUrl, 7 );
}
Then add the following markup block to our
<head> updating the values of each of the fontsWOFF, fontsWOFF2, fontsTTF variables with the URL of the Data URI CSS font format file. Note that when the cookie has been set and contains the value of the URL of the font format we want to load, a blocking link element is inserted into the page pointing to the Data URI CSS file. However, the blocking behavior of this request is okay because the CSS request has already been cached by the browser and it will load almost immediately.<!--#set var="fontsWOFF" value="/css/data-woff.css" -->
<!--#set var="fontsWOFF2" value="/css/data-woff2.css" -->
<!--#set var="fontsTTF" value="/css/data-ttf.css" -->
<!--#if expr="$HTTP_COOKIE=/fonts\=$fontsWOFF/" -->
<link rel="stylesheet" href="<!--#echo var="fontsWOFF" -->">
<!--#elif expr="$HTTP_COOKIE=/fonts\=$fontsWOFF2/" -->
<link rel="stylesheet" href="<!--#echo var="fontsWOFF2" -->">
<!--#elif expr="$HTTP_COOKIE=/fonts\=$fontsTTF/" -->
<link rel="stylesheet" href="<!--#echo var="fontsTTF" -->">
<!--#endif -->
The code above requires Apache Server Side Includes but you could do something similar with any server side language.
For more detail on this approach using cookies, we’ve also provided a live demoand the source code on GitHub.
Wrapping Up
Using web fonts can really be a great way to improve the quality of our web work, but using web fonts with the default loading behavior can be very detrimental to our page’s perceived performance. The above method works great to eliminate the text invisibility usually associated with
@font-face and make our pages usable much faster. We hope you (and your visitors) find it useful!


Follow Us
Myself Govardhan, Full Stack Web Developer carrying 3yrs of experience is actively looking for job in UAE,. Expertise in Angular, Node JS, TypeScript, Bootstrap, Express JS, Mongo DB, SQL, Javascript, jQuery, Grunt, Photoshop and many more.